MacOS Image Background remove with Automator

If you need to remove the background from multiple images, MacOS Automator does not provide a background removal action out of the box but the existing tools from MacOS can be combined to provide a solution to create a flexible batch job.
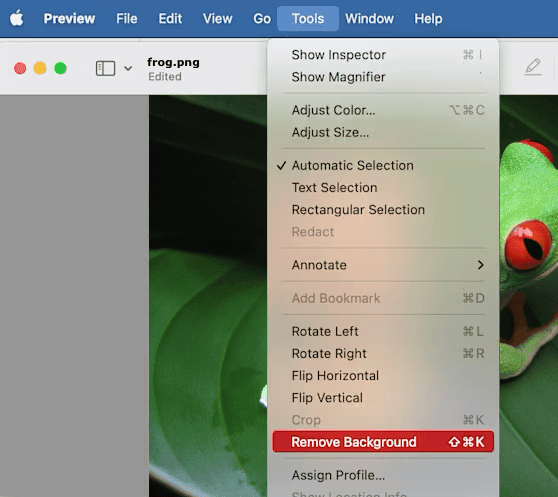
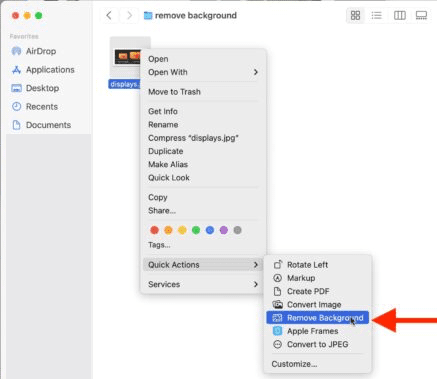
Since MacOS 15.x (Sequoia) provides the following manual options to remove the background from Images:
Preview App

Finder Shortcut "Remove Background"

**Note: the Finder Shortcut supports the transformation of multiple selected images! Use this if you do not need any control on output folder or file name.
Automator Solution
- Open Automator and create a new document
- Choose Application as the document type
- the first Action will be a short AppleScript to move an existing target folder to the trash folder. Add Action
Utilities -> Execute AppleScript
1on run {input, parameters}23 tell application "Finder"4 -- Define the folder path5 set folderPath to (path to downloads folder as text) & "Images with removed Background"67 -- Check if the folder exists8 if exists folder folderPath then9 -- Delete the folder10 delete folder folderPath11 end if12 end tell1314 return input15end run
- Add Action
Files & Folders -> New Folderto create a new FolderImages with removed Backgroundin the downloads folder. Any Image or Folder dragged on this Automation will be copied to this folder. - Add Action
Files & Folders -> Get Folder Contentsand select the optionRepeat for each subfolder found - Add Action
Photos -> Change Type of Image. Cancel the dialog which asks you to add an additional action to copy the images before changing the type. This is not needed, as the images in the new folder are already copies of the original images. The format change is required as the Preview.app will replace the removed background with a transparent layer which is not supported by the JPEG format. - Add Action
Utilities -> Execute AppleScript
1-- Wichtig! In Systemeinstellungen -> Datenschutz & Sicherheit2-- muss die App "Bilderfreistellen" unter Bedienungshilfen und3-- die App "Vorschau" unter Festplattenvollzugriff gelistet sein4on run {input, parameters}5 tell application "Preview"6 activate7 repeat with imgFile in input8 -- Open the image file in Preview9 open imgFile1011 -- Wait for Preview to fully open the file12 delay 11314 -- Send the "Shift + Command + K" keyboard shortcut15 tell application "System Events"16 keystroke "k" using {shift down, command down}17 end tell1819 -- Wait for the command to finish processing20 delay 12122 -- Save and close the file23 tell application "Preview"24 close document 1 saving yes25 end tell26 end repeat27 end tell28 tell application "Finder"29 -- Define the folder path30 set folderPath to (path to downloads folder as text) & "Images with removed Background"3132 -- Check if the folder exists33 if exists folder folderPath then34 -- Show the folder35 open folderPath36 end if37 end tell38 return input39end run
- Save the Automator document under
Image Background Removal
The last AppleScript will iterate over all images in all subfolders. The background ist removed with the tool provided by the Preview.app. When finished the the created folder with the transformed images will be opened in the Finder.
To provide this Automation with the required access rights you will need to:
- add the
Image Background RemovalApp toSystem Preferences -> Privacy & Security -> Accessibility(you will need to redo this if you change your Automation App!) - add the App
Preview.apptoSystem Preferences -> Privacy & Security -> Full Disk Access - allow your
Image Background RemovalApp to control Finder, Preview and System Events - which will add it toSystem Preferences -> Privacy & Security -> Automation
To use this Automation drag one or multiple images or folders with images on this automation.